Saturday 30 June 2012

Just a little note


This weeks Less Is More challenge is to take inspiration from their blog header: 
Circles are 0.5, 0.75 & 1 inch, popped up on foam pads, sentiment (Tempus Sans ITC) created with Silhouette StudioNote is from clip art found on the web.


Linking to:
Less is More 74 ~ blog header as inspiration
Cas-ual Fridays ~ CFC59 Round & Round

Friday 29 June 2012

Smile Monster

Stamps: Little Monster (Woodware); Smile (Elzybells)
Ink: Lilac Posies (Memento)
Other: 1.5 & 1.75" circle punches; corner chomper; wide clear tape
Card: from my stash, unknown
This is my entry for Cas-ual Fridays 2 circle challenge.  I just hope its clean & simple enough.
Strips of card are 0.5 inch wide, trimmed with my corner chomper.  Gloss on the monster is clear tape applied before punching out.  I punched a hole in the strips so the circle sits flush with the card front. The front of the card base has been shortened so that the strips make the card edge.


A monster, googly eyes & a cheery colour combo - what's not to smile about?

Linking to:
CAS-ual Fridays: CFC59 ~ 2 circles

Thursday 28 June 2012

Computer sentiment tutorial

A number of people have asked how I do my computer sentiments, so I have put together a tutorial  for how to do it using MS Publisher.  My software of choice is Silhouette Studio (available to download for free) but I figure that more people would have Publisher already installed.
Sorry, but this is a picture heavy post, so may be frustrating to read if your connection speed is poor.

I have used this card for demonstration purposes, because the sentiment had to be in a very specific place.
I knew that the finished card would be A6 ~ 14.8 x 10.5cm.  I measured the stamp I was going to use, & decided that a 4.8cm square would look the best.
Open MS Publisher & draw your card front to the right size as shown below.

Repeat steps 1 to 4 to make a square 4.8cm long.


With only the square selected, you can then use the up & down arrow keys on the keyboard to move it to the right place.  If you have a specific distance from the top, draw another rectangle using this dimension as the height, & use the new rectangle as a spacer (hope that makes sense...).

Now for the sentiment.


Now you can use the keyboard arrows to position the sentiment exactly where it needs to be in relation to the other items on your card.


So now you are left with the sentiment in the right place for printing on an A6 card, at the bottom of an A4 sheet of paper.

Some things to remember:
Don't worry, you can always undo stuff.
When putting text close to the edge of the page, your printer might leave a border so be aware of this.
Try it out on cheap computer paper first.

Phewwww!  I'm worn out now.  Congratulations if you have managed to stay the course.  I hope I have made things clear enough; I find it a difficult line to tread- giving sufficient info without being patronising.  If something is still unclear, leave me a comment & I'll try to help.

Wednesday 27 June 2012

Well done

Stamps: Teeny Trees (Waltzing Mouse)
Ink: Teal Zeal (Memento)
Font: Brush Script MT, Narkism, Copperplate Gothic Bold
Card base: 9.9cm square Hammered White (Paper Mill Direct)

Well, this one just sort of ran away with me.  You start stamping in one corner, without any real idea in mind & whoosh, there it is.  The aqua colour was achieved by second stamping the Teal Zeal.  I'm quite please of the random nature here, I guess that's what happens when you stamp without a plan.


The sentiment was created digitally from the 3 different fonts & printed after the main stamping.  The line & 2 leaves were added later, using a tree stalk from the same set.

Linking to:
One Layer Wednesday: OLW94 ~ it's all about size (oo-er missus...)
Stamp It Cards Week: Congratulations Challenge

Tuesday 26 June 2012

Mojo Monday 247


Papers: Stars & Stripes (Crystal Wilkerson)
Font: Stencil
Card base: 5" square hammered white (Paper Mill Direct)

Was extremely lacking in inspiration this week until these papers popped into my e-mail from Crystal Wilkerson.  And they are only 66p today yay!
Anyway, these just screamed BOY at me.  Which is lucky, as I have a number of special boy birthdays looming.

Using the Mojo Monday sketch, I designed it digitally & printed all the pieces off on a single sheet of A4.  I made up the 10 using the colours from the paper & sized it so I could punch it out with a 1.75" punch.
Dithered a bit about centralising things, & yes, that 10 is deliberately skew-whiff (had to look up how to spell that - have never had to write it before!).


Linking to:

Saturday 23 June 2012

You float my boat


Stamp:  Tremendous Treats Valentine (PTI)
Ink: London Fog (Memento); Aqua (Ranger Adirondack), Christmas Red (HobbyCraft)
Paper: " Peas in a Bucket, Sheryl K Designs, Shabby Princess
Font: Migraine Sans
Here is my entry for this week's Less is More - paper piecing, hurray!
I printed the sentiment then masked off a square using torn edge paper for a softer finish.  I stamped the boat then sponged in the sky with aqua ink.  Originally, the sea was sponged with darker blue, but it looked all wrong, so I paper pieced it instead.  The heart & flag were sponged with red & cut out - the heart has sellotape over it to give it a bit of gloss. 


This is very similar to a card I made a couple of weeks ago using another stamp from the same set.

Linking to:
Less is More: Week 73, Paper Piecing

Friday 22 June 2012

That frame again...

Stamps: Bitty Banners (Waltzing Mouse); Circus Animals (My Cute Stamps)
Ink: Pearlescent Purple (Brilliance); Lilac Posies (Memento)
I told you once I found an idea, I worked it hard!  Banners instead of washi tape today though.

The lion was stamped on DP & then the mane coloured with Promarkers. The dots were made using the Promarker blender.
If you haven't seen the first card I made like this, find it here.

Linking to:
Casual Fridays: CFC58, Pretty in Pink

Thursday 21 June 2012

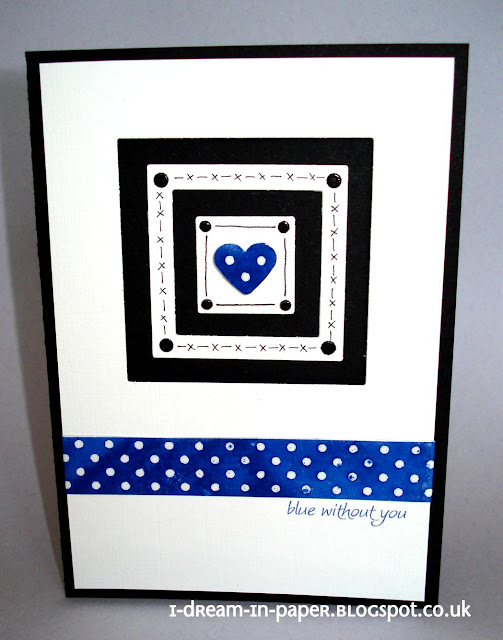
Blue without you


Stamp: Gingham & Co (Waltzing Mouse)
Ink: Blue Danube (Memento)
Font: WorstveldSlingExtra2Oblique
Other: Nesting square dies (Quickutz); heart punch, Button Dies (MFT)
Ooh I so hated this colour combo when I first saw it on The Play Date Cafe this morning.  Much too difficult.  Still, that's why it's called a challenge...


I took inspiration from Ardyth's love of black frames here & dived right in.
It all looked a bit harsh to begin with, hence the doodling in the frames.  I also like the imperfect stamping (intended, of course!).  All the gloss is from a layer of sellotape prior to cutting.  The brad bits on the frames are the holes from the button dies. The heart reminds me of a lovely china button I saw at a recent show but was too stingy to buy!

Linking to:
Play Date Cafe PDCC137

I won a badge!

Last week at the Play Date Cafe, PDCC136
Cream in our Coffee at The Play Date Cafe
for this card. 


How chuffed am I?  V v v v chuffed.  Thank you ladies!

Hexagon card

Stamps: Geo-Graphics (Paper Smooches); Fanciful Flowers (Elzybells)
Ink: Rose Bud (Memento), Studio G Chalk
Font: Winnie the Hoop; Trocchi
This card was inspired by this one for Hero Arts by Julie Ebersole. I had to mask of part of the hexagon stamp while inking, as it is much wider than I needed.  You can't see very well from the photo, but the patterned piece is mounted on the base using foam pads.
The only thing I am not entirely happy about is where I had to chalk-on-Versamark for the flowers. But that's what happens when you embark on an orange / fuchsia colour scheme with no orange ink pad!!!

Rescue Mission:

Slept on it.  Decided I couldn't leave it alone.  Did what all good crafters do with an error - covered it up with bling.  Stamped hexagons on to scrap paper, cut 3 individuals out & stuck them over the (now to my mind VERY offensive orange flowers) & finished with some pink jewels.  NOW I love it.


Linking to:
Less is More: LIM72 - Something Shiny

Wednesday 20 June 2012

OLW93 - In the Kitchen

So, this week we are invited to take inspiration from the kitchen  Notice THE kitchen, not YOUR kitchen.  My kitchen is singularly uninspiring.  I was considering trawling pinterest until I saw IT. 
What was IT I hear you cry?    Not the stack of recycling bins in the corner.  Not the half full bowl of cat food that is seemingly invisible to the cat.    Not the small pile of crumbs under the toaster.  (I did briefly toy with the idea of attaching these in a neat line via sticky strip, like glitter).  Not the mess of post waiting to be filed.  Appalled?  Read the sub-heading of this blog again....

IT is a small basket I made from the Lakeland catalogue many months ago, that sits on the window sill as a repository for all the small bits & pieces whose origins are as yet unknown, but will become immediately apparent as soon as they have been consigned to the bin.  Yes, the junk pot.  How sad am I that this is the most inspiring thing in my kitchen?  In all fairness, it is on the to do list, just not at the top.
 

Stamps:Text Style, Polka Dot Basics II , Star Prints (PTI); Fancy Phrases (Waltzing Mouse); Background Stripes (Hero Arts)
Ink: London Fog, Rose Bud (Memento); Versamark; Sudio G chalks
Font: Winnie the Hoop, Trocchi
 I designed & cut the template with Silhouette Studio & then masked off bits & pieces with Post It notes.  The full colour panels were achieved by sponging, some with Versamark & then chalk. 
I'm now wondering if I should have moved this more towards the centre of the card.  Undecided.


Did you see the little flourish that sneaked in while I wasn't looking?  Also, can you tell I read an article about how to improve your photos - note the seamless background.  When I get my new craft room (not SO far away now) I am definitely making a light box.


Linking to:
One Layer Wednesday: OLW93, In The Kitchen


Tuesday 19 June 2012

Giraffe child's card

Stamps:  Circus Animals (My Cute Stamps); Boxes, Bags & Tags (PTI); Gingham & Co (waltzing Mouse)
Ink:  Summer Sky (Memento); Chocolate Brownie (Elzybells)
Card:  Kraft (Anna Marie Designs), Blue (Paper Mill Direct)
Other:  Button Die (MFT); Button Twine (Waltzing Mouse); ribbon unknown, 1&1/8 circle punch

The football is on (just for a change...), so I'm taking advantage of the peace & quiet.  As soon as I saw this Mojo Monday sketch, I thought GIRAFFE.  Of course, the image in my head in no way resembles the final product, but that's pretty much how it usually goes.


Linking to:
Mojo Monday: Sketch 246

More flourishes

Stamp:  Fancy Phrases (Waltzing Mouse)
Ink: Rose Bud (Memento)
Font: Brock Script, Trocchi
Having announced rather boldly last week that I am not a flourishy kind of a girl, here is another card made using flourishes.  I think like them when I can bend them to my will in nice, regular patterns, not when they're being all random and... well... flourishy!


Clear gems were coloured with promarkers to match(ish) the font.  Colour combo inspired by the new Clinique ad on the tv last night!

Linking to:

Saturday 16 June 2012

Something Shiny

Stamp: Circus Animals (My Cute Stamps)
Ink: Tuxedo Black (Memento)
Font: Narkism
Glitter: Raspberry, Violet, Baby Blue ultrafine
The stars were die-cut from sticky labels using MFT dies, then glitter applied in vast quantities.  The 2 stripes are super sticky red line tape with glitter on.  The sentiment is computer generated - couldn't decide which to go for, so went for them all.

Can also now enter me, my desk & my craft room into the something shiny category.  Haven't used glitter for a while... am remembering why!

Linking to:

Thursday 14 June 2012

One Layer Wednesday ~ on the edge

Stamps: Polka Dot Basics II (PTI); Mesh (Visible Image)
Ink: Pear Tart, Rhubarb Stalk (Memento)
Font: Special Elite 
Printed out the sentiment & added the faux washi tape as described HERE.  Originally intended to mask it so the red was 'over' the green, but I forgot &  I like it like this now.


Linking to:
One Layer Wednesday: OLW92 - On the Edge

Wednesday 13 June 2012

Good luck card

Stamp: Tremendous Treats Valentine (PTI)
Ink: Aqua (Ranger Adirondack); Summer Sky, London Fog (Memento)
Font: Narkism

I masked off a circle & sponged the cloud effect with a pieced of hand scalloped paper.  The plane is paper-pieced, coloured with sponged ink & prisma colour pencils.  I created the banner & sentiment digitally, & then coloured the sentiment in with coloured pencils.
Originally the card was longer, with the intention of doodling a trail behind it leading to the banner.  Could not get it to look right, so cut it back to a nice, comforting square.


Monday 11 June 2012

Buckets of love


Stamp: Tremendous Treats Valentine (PTI)
Ink: Aqua (ranger adirondack); Antique Linen, Tumbled Glass (Distress Inks); Christmas Red (HobbyCraft); unknown orange; London Fog (Memento)
Card base: A6 ivory (Anna Marie Designs)
Font: Migrainesans
I've not had much success with sponging in the past, but I'm dead chuffed with how this card has turned out.  I printed out the sentiment first - right back in my comfort zone after Saturday's horrific experience with you-know-who - & masked off the square using torn edged paper for a softer look.


The image was stamped 3 times: once on the card & then twice on white paper.  I sponged the different areas on the 2 separate images & then paper-pieced them together.  I put some sellotape over the heart before cutting out, for a slightly glossy finish.  Originally tried colouring the bucket with pro-markers, but that was just too harsh against the sponged background.

Love it love it love IT.  Fully expect tomorrow to find a challenge with a seaside / summer theme that I now can't enter!

Linking to:

Saturday 9 June 2012

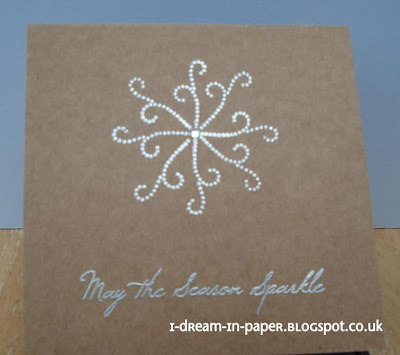
Less Is More Challenge 71 - use a flourish

Hi folks, I'm back & have finally emerged from under the heap of post-holiday laundry... there's some housework you just CAN'T avoid!

Stamps: Boxes, Bags & Tags (PTI); Season Sparkle (My Cute Stamps)
Ink: Versamark
Card: Kraft card (Anna Marie Designs)
Other: silver detail embossing powder

This week's Less is More challenge is the dreaded one-layer, & you have to incorporate a flourish.  Now, I'm not a flourishy kind of a gal; I had to search high & low just to find one in my stamp collection, & it's certainly never seen ink before.  It's not even very flourishy, so I hope it qualifies.

Can anyone explain to me why, when you try out a concept roughly, on scrap paper, just eyeballing placement, it comes together like a dream, yet when  you transfer the same design to your best cardstock & measure centres exactly etc, it's completely pants?  When I used to work, this phenomenon was referred to as a visit from the F**-up Fairy.  Well guess what, she's been lurking in my craft room waiting for me while I was away!


The card you see above is attempt no. 4, & even that's not quite as perfect as I'd like.  You stamp the flourish beautifully, & the sentiment smudges, or isn't straight..  I've remembered why I do so many sentiments on the computer.  OK, I'll do the sentiment first.  Fine.  So now the flourish is all wonky, or there's extra embossing powder where there shouldn't be.  Are you getting the picture? 


Linking to:

Related Posts Plugin for WordPress, Blogger...