Wednesday 30 May 2012

One Layer Wednesday - for the man in your life

Stamps: Bitty Banners, Tiny Trees  (Waltzing Mouse)
Ink: Blue Danube (Memento; Christmas Red(HobbyCraft)
Font: EcuyerDax, Narkism
The layout was designed in Silhouette Studio.  I scanned in the stamp sheet & used the banner stamp to get the size & position of the letters before printing out on the PC.
Then it was easy just to stamp in the right place.  Simples!

This is the last one from me for a while folks.  It's half term next week, so I won't have any time in my messy corner of the conservatory craft room.

Linking to:
One Layer Wednesday: OLW90 Dudes Rule

Monday 28 May 2012

Mojo Monday challenge

Stamps: Circle-a-Thon (Schlosser Designs); Boxes, Bags & Tags (PTI)
Ink: Pear Tart, Bahama Blue (Memento)
Other: Pear Green promarker; 1.125" & 1.375" circle punches; button twine (Waltzing Mouse)
Didn't have any green cardstock to match the ink, so I use a promarker on white for the same effect.
This is a lot fussier than I normally go for, & the jury's still out.  I think I might change the blue tags on the sentiment - they don't really work too well - but I love love love my new button twine from Waltzing mouse.

UPDATE:

Replaced the silly square tag thing with a nice sensible faux button!  It's never going to be love, but at least I'll let it live.  Only now I'm thinking it still needs a sentiment...

Linking to:

Saturday 26 May 2012

Shaped birthday card

Paper: Hopscotch Boy (K & Co.)
Fonts: Aharoni, Special Elite

Fiddly to make, harder to photograph & probably impossible to write in!
Shape & letters designed & cut with Silhouette Studio.

Linking to:
Less is More: Week 69, Not a square
CAS-ual Friday: CFC54 Using masculine designer paper

Friday 25 May 2012

Play Date Cafe Challenge 133 - baby blue, denim & cherry

Isn't it just typical?  You post a card with a new (to you ) colour scheme & the very next day a challenge arises that it would fit perfectly, if only back-dated entries were allowed.  Harumph.

Stamps: Fanciful Flower (Elzybells, discontinued); Boxes, Bags & Tags (PTI)
Ink: Danube Blue, Summer Sky (Memento); Christmas Red (HobbyCraft)
Card: from my stash
Font: EcuyerDAX
Base: A6 hammered white (Paper Mill Direct)
A bit outside my comfort zone - all those flowers & using the whole of the available space - but I guess that's what a challenge is all about.
Thanks for putting me on to this one Julie!

Linking to:
Play Date Cafe: PDCC133 Baby Blue, Denim & Cherry
Papertake Weekly: True Colours

Wednesday 23 May 2012

One layer Wednesday (OLW89)

Stamps: Bitty Banners (Waltzing Mouse); Cake unknown
Ink: Christmas Red (HobbyCraft), Mediterranean Blue (Brilliance); Aqua (Adirondack); Versamark
Other: white embossing powder
Just a quickie - more of the same really, but without the paper piecing.

Linking to:
One Layer Wednesday: OLW89, Something Sweet
Papertake Weekly: True Colours

Same technique, improved execution


Same stamps etc as yesterday
Ink: London Fog, Rhubarb Red (Memento), unknown orange
Same idea as yesterday, but this time I drew around the 'tape' pieces using the window as a light box, & cut them out more accurately before using them as masking pieces.


The eagle-eyed amongst you will notice a small smudge of red towards the bottom left of the mask photo, that has disappeared for the final.  I sanded it down lightly & filled it with white gel pen.  This textured card is very forgiving!

Tuesday 22 May 2012

How rude of me..

to forget to say welcome & thank you to my first followers - Julie, Judith & Therese!

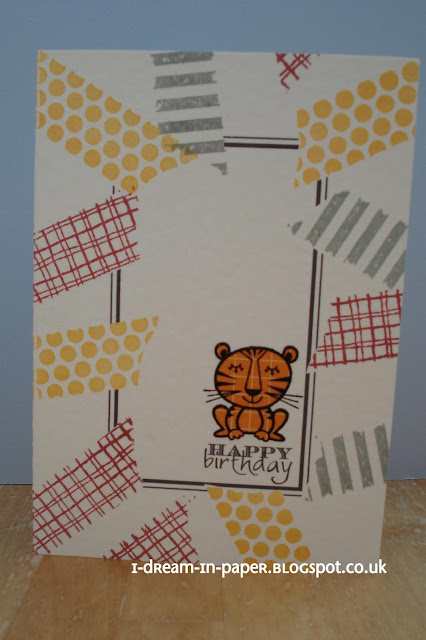
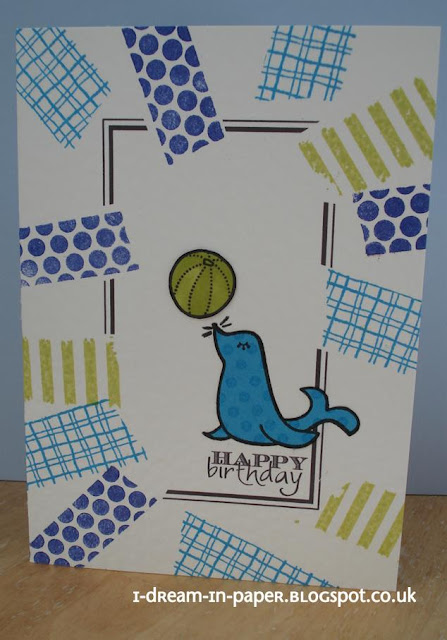
Faux washi tape card

Surfing around the other day, I came across this fab card, by Therese at Lost In Paper.  I carried it round in my head for a while, & this is what I came up with.

Stamps: Polka Dot Basics II (PTI); Mesh (Visible Image); Background Stripes (Hero Arts); Circus Animals (My Cute Stamps)
Ink: Pear Tart, Bahama Blue , Tuxedo Black (Memento); Mediterranean Blue (Brilliance); Versamark
Font: EcuyerDAX, Worstveld Sling Extra
Card base: A6, hammered white (Paper Mill Direct)


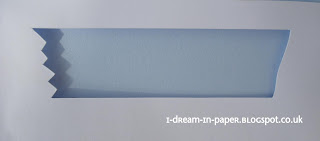
I wanted to make it look as if the frame were stuck on with washi tape.  I don't possess any washi tape, as it is hard to come by in the UK, so I made me a stencil.
I tried both ends out before stamping on the card, & the zig-zag end was just too fussy, given that the stamps I used left quite a lot of white space.

I designed the frame in Studio, & sketched it lightly in place prior to stamping.

Then I masked off the pieces of frame that would be under the 'tape' (not quite as accurately as I thought... there are a few big gaps!), & ran the card through the printer.


I stamped the seal once on the card & again on a scrap of blue & added some Versamark polka dots.  Cut out the blue seal using my new favourite tonic studios scissors, & stuck in place with Pritt stick.


Decided something was missing, so added the ball.

Took a few photos, smiled smugly & congratulated myself that all the ink was in the right place... opened the card & found a HUGE great ink smudge.  Don't know how it got there ;).  Still, gives me an excuse to play all over again!

Monday 21 May 2012

Invitations for a Christmas wedding

This week I have been helping a friend with wedding invitations for a relative.

We had 50 to make, so had to keep the design simple to put together, but at the same time needed to meet the brief of Christmas colours.

First step was to look & see what tools / materials we already had that we might be able to use.  Then we did a mock up on the computer using Silhouette Studio, to get an idea of proportions.


We worked out the sizes needed for the embellishments on an A6 base, & positioned the writing to suit.  It was easy then to print out the front of the invitations, 2 to an A4 sheet, on ivory linen card from Paper Mill Direct.

The wording inside was done in MS Publisher, font is Worstveld Sling Extra Oblique.


A simple pocket was created to contain the wedding list details & venue addresses.  This was far & away the most time consuming part of the whole exercise.  I used a template to mark the ends of the slots (but this didn't occur to me until some time in... doh!), & a 1/16" hole punch.  Using a hole at each end reduces the risk of the slots tearing when the paper is inserted.  The slots were then cut with a sharp knife & ruler.

Finally ready to embellish.  The heart design is a download from the Silhouette store, sized to fit an existing punch.  The postage stamp shape is a cuttlebug die.  The mock ribbon was cut into strips, notched & then embossed with swirls. The square is mounted over the ribbon on 2mm foam pads.

Saturday 19 May 2012

Sailing boat card

Paper: Ocean dots (Pink Petticoat Fairy Lights)
Card base: 9.9mm square, hammered white (Paper Mill Direct)
Tools: scallop punch, hole punch, Crop-a-dile, 1.5" circle punch,Quickutz nested square dies
The boat was easy to make - half a circle & 2 simple cut triangles.  For the portholes, punched the small holes with the Crop-a-dile & then with a standard office hole punch.  The wave is the punched out waste from my scallop punch that was just in the right place at the right time!

All matted on to silver mirror board & framed using a square die.  The scalloped square was cut with my Silhouette SD.

Linking to:
Less is More:  Week 68 Baby or Child
CAS-ual Fridays:  CFC53 Punches or Dies

Friday 18 May 2012

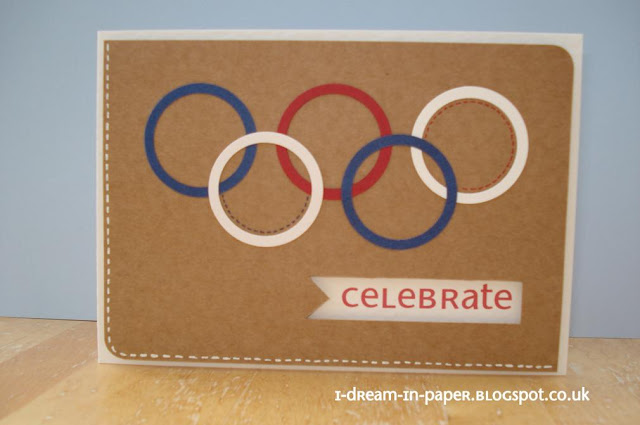
Another day, another challenge...

CAS-ual Fridays are challenging us to use punches or dies this week.
I did start off by die-cutting the celebrate aperture with the Spellbinders pennants, but it was too big for the card, so I cut it by hand instead.  The rings are punched with a 1.125 & 1.375 inch punches. Always cut the smaller hole first.
It looked a bit too naked, so I added the faux stitching, but not much.

Linking to:
CAS-ual Fridays: CFC 53, Punches or Dies

Wednesday 16 May 2012

Make a Post It Note holder

There are a lot of these to be found on the web. I think this version is a bit beefier than some I have seen, so may be a little more robust.
This is a bit of a photo heavy post, so you may want to grab a cup of tea first...
To make this you will need a cereal packet, plain paper & patterned paper.   Measurements are to fit a standard Post-It Note & the pencil I have used.  You may have to adjust things slightly, depending on your choice of writing implement.
First, cut  3 10 cm squares from the cereal packet.  


I have found that scoring lightly with a knife allows the glue to penetrate the cardboard a bit better, & make for a stronger finished item.  If you are using dry adhesive, omit the scoring.
Glue the 3 layers together & leave under a heavy book for a few minutes.


When the the square is dry, cover it with the plain paper.  Make sure it is a little wider than the square & just over twice as long.  Sit the square to one side, allowing an even border on 3 sides.  Draw around the square & cut as shown.
Stick the square in place with dry adhesive &, using an embossing stylus (or old biro) score around the edge, to make folding the paper easier & give a neat edge.  Fold & stick the 3 small flaps first & then the large one.  The side of the square where the flaps meet will be the BACK of the note holder.


To make the front piece, cut the patterned paper to the same width as your covered square.  Depending on the thickness of the plain paper you used to cover the square, it may have grown quite a bit, so re-measure.
The pencil I used needed a 1cm square hole to middle piece back through the hole.
 Apply strong adhesive as shown by the red lines.  This is actually red line tape, which is super sticky, so that the front piece won't come away. 
Orientate the covered square so that the flaps meet on the back, on the pencil side of the holder.  This way, the major join will be hidden when the front piece is in place. 
Carefully place the front piece in position & stick it down, folding the small flap around the back.
Finally, stick the note-pad in place.  Don't just rely on the sticky back of the notes, use some double-sided tape.

Chevron patterned paper is from Pink Petticoat, colour is tangerine.  Pencils were a lucky find in Sainsbury's last year - from the kids' party bag section.

Well congratulations if you've made it to the end.  I think this post took longer to write than it did to make.  Enjoy!


Sunday 13 May 2012

Notelets


I made 4 more cards the same as yesterday's, lined them with cream paper, used the same stamps to co-ordinate the envelopes et voila.  A clean & simple notelet set. 


Saturday 12 May 2012

Less Is More Challenge - One Layer

It's half past nine & this is my second post of the day! 
One of the reasons I started this blog was to be able to enter challenges.  Less Is More have a toughie this week - 3 stamps only.  It took some thinking about, but I got there in the end.
Stamps: Miss you (My Cute Stamps); Text Style, boxes Bags & Tags (PTI)
Ink: Chocolate Brownie hybrid (Elzybells - now discontinued)
Card base: 9.9cm square, kraft card (Anna Marie Designs)

I also tried it in colour on white, but prefer the kraft.  What do you think?


I think I will make a bunch of these as notelets to sell at a craft fair - with only 3 stamps, it'll be a breeze!

Linked to:

50th birthday card

Stamps: Star Prints, Text Style, Polka Dot Basics II (PTI), mesh (Visible Image)
Ink: Tuxedo Black (Memento)
Paper: Orange Soda (Crystal Wilkerson)
Sentiment: Migraine Sans
Card base: 9.9cm square, linen white (Paper Mill Direct)
This was a new technique I tried out, & I am very pleased with the result. 
I printed out the sentiment on the card base & stuck on the template below with temporary adhesive.  To make sure I got the holes in the right place relative to the sentiment, I pressed them up against a window so I could see the text through the card of the template.

Then I masked the holes off individually using post-it notes.  Only a tiny portion of the stamp was inked up, & then stamped through the holes.  The Star Prints set from Papertrey was ideal for this as it contains a huge variety of small scale patterns.

I cut out the numbers 3 times: once in paper & twice in card.  Before the layers were adhered together, I went around the edges with an orange felt tip pen.  The paper was a scrap left over from a previous project.
The numbers were then fixed on using sticky pads.

I can see this as a stand-by card, with a supply of numbers ready to hand at the last minute!

Thursday 10 May 2012

Owl card

Sticker: Accessorize
Branch: Silhouette store
Sentiment: Worstveld Sling Extra
Card base 9.9cm square, white linen (Paper Mill Direct)

Not much to say about this one really - does exactly as it says on the tin.  The sentiment is computer generated, matted on to a scrap of aqua card that matched the owl, & mounted on foam pads.  The idea was that it should look as if it were hanging from the branch.  Not sure that works really... 
Things were looking a little bare, so I punched out some tiny stars & that has improved it.  Not one of my best efforts, but not the worst by far!

Rainbow notebook


Today started as a NON-mojo day.  It had gone into hiding.  Not behind the sofa.  Not under the bed.  Then it snuck up on me & said 'boo' while I was putting the shopping away.
I am SO chuffed with the way this turned out.  This notebook was made using 1 cereal packet, 12 pieces of computer paper & an A4 piece of my favourite kraft wrapping paper.  I have made a few notebooks in the past, but this is the best to date.
The note pages are simply 48 A6 pieces of computer with PVA glue along the spine.  The covers are made from 3 layers of cereal box.  The notes design was created in Silhouette Studio, but MS Publisher or Word would do just as well.  It's pure luck that the words fit perfectly on the available space - don't you just love it when that happens! 
I adhered the wrapping paper to an A4 piece of card to get it to go through the printer, as it was trying to roll up.


 It's hard to see from the first picture, but there is a piece of beading elastic fitted over the front to keep it closed.  This is held in place with the eyelets you can see in the back.  Not pictured is the inside of the cover, which is matted with the same purple as the spine, to hide the folded over edges of the kraft paper.


Love it love it love it.  Think I'll make a few more to sell at the school summer fair.

Wednesday 9 May 2012

Personalised soap dispenser


I made this for a teacher gift this year, using instructions found here.  I made my own 'subway art' using Silhouette Studio (the software is free to download & I use it for a lot of printing, not just to cut with my Silhouette SD). 

The words are printed on acetate, using a laser printer (or a photo-copier).  I don't have one, so I printed them on paper & took it to my local library, along with the acetate.  Ink-jet printing won't work.  The words just flake off.  Trust me.  I found out the hard way.

Tuesday 8 May 2012

Hello Kitty card


Easy peasy lemon squeezy.  Found an image on the net & printed it out on the card base, then on the patterned paper.  It's a very forgiving image to cut out - the black lines are nice & thick.  Add a bit of bling.... perfect for a Hello Kitty fan.

Only have a scrap of patterned paper to hand? Don't worry.  Print on to normal computer paper first, then stick the scrap over the part of the image you want to be patterned, using temporary adhesive.  Run it back through the printer again & the image will be printed on to the patterned paper.

Submitted for Top Tip Tuesday Challenge 76 - Clean & Simple

Monday 7 May 2012

Teacher thank you cards


Dingbats: dB Fruit Bowl
Sentiment font: WorstveldSlingExtra2Oblique
Card base: A6 hammered white (Paper Mill Direct)
Other: Provocraft Celebration Stamps die, Crafts Too square punch

It's getting to that time of the year, & I like to be ahead of the game.  I love the fruit shapes in the dB fruit bowl font, & these aren't the first teachers' cards they've appeared on.  I centred the images in their squares, punched them out with a square punch & mounted them on the die cut stamps.  I had thought they looked pretty square & even when I stuck them to the card base, but this picture says otherwise...

Sunday 6 May 2012

Technique with Versamark pad & chalk

Stamps: Miss You (My Cute Stamps), Teeny Trees (Waltzing Mouse)
Ink: Versamark
Card base: 9.9cm square, linen white (Paper Mill Direct)
Other: Studio g Fresh Chalk
This technique was born from the CAS card I made the other day.  The one that took so long to come together. 

I love the fine lines of the 'Miss You' set by My Cute Stamps, but wanted to re-create them on a single layer card.  When I stamped these on my standard card base, they bled a bit & ruined the effect I was after.  But I wanted the linen texture on my card as well.  I'm too greedy.  I thought about embossing, but only have limited colours available.  Then PING! A light bulb moment. 

What I do have are some cheapy chalk sets from Studio G, in the colours I was considering.  What happens if you stamp in Versamark & apply a little chalk?  You get to keep the fine lines & the paper texture.  Result.  And you can blend them a bit.

The paler orange doesn't really show up on the photo, in spite of my superior photographic skills ;).  On reflection, I should have done the sentiment in the darker orange too.  I think it's a bit too subtle.  Still, we live & learn.

Hope you like it.

Saturday 5 May 2012

Forty & fabulous

Paper: Perfectly Pink (Crystal Wilkerson)
Tools: hole punch, corner chomper
Sentiment: computer generated (Modern No.20)
Card base: 9.9cm square, linen white (Paper Mill Direct)
Ran the card throught the printer to get the sentiment. Printed out a 40 of the right size & fixed the 2 'holes' with temporary adhesive.  Put sellotape over the paper for shine & punched out a random selection of circles with an ordinary hole punch.

Fixed tiny foam pad to the back of each circle & stuck it in place.  Decided circle in the wrong place, cursed, removed from card & repeated... This card took a while!

Finally, took off the corner for a bit of added interest at the top.


Friday 4 May 2012

It's never too early to make a Christmas card..


Paper: Snowy Day (Crate Paper)
Stamp: unknown
Other: Anita's 3D Gloss
Card base: 9.9cm square, hammered ivory (Paper Mill Direct)
Nice & simple card, easily reproduced.  Stamped the robin 3 times - on to cream, brown & then just the flower on to red.  This is a good stamp for paper piecing as is has quite a thick line, so any errors in cutting are hidden when it is stuck down on the original.

The flower was a bit fiddly, but I like the result, with the glossy finish.


Thursday 3 May 2012

Clean & simple's the name of the game


Stamps: Miss You (My Cute Stamps)
Ink: Tumbled Glass (Ranger Distress Ink), London Fog (Memento)
Card base: 9.9cm square, linen white (Paper Mill Direct)
This card didn't come easily to me.  I had a half-formed idea way in the back of my head that made me dry emboss the centre square.  Then I sat & looked at it for a while.  It stared back, but didn't give me any clues.  We sat like that for a while.  Eventually I tried to find a stamp that would fit. (Duh! Why didn't I do a square to fit, around a chosen stamp?).  Faffed about for a bit longer, but as soon as I saw this stamp, it spoke to me.  Much more than the card base did.

And then I'm on a roll! Did a light application of ink.  I like the way it really highlights the frame & also brings out the texture of the card base.

Promarkers used: Cool Aqua, Duck Egg
Coloured in the stamped image & adhered it with foam pads.

I'm not sure it bears any resemblance to my original idea, but I like it.  I think I'll be trying this format again...

Linking to:
Less is More - Week 65 Sketch
Related Posts Plugin for WordPress, Blogger...